Introduction
Traveling and backpacking can be incredibly rewarding experiences, allowing you to explore new places and immerse yourself in nature. As a photographer who loves to travel, I often find myself on multi-day hikes, capturing the beauty of the great outdoors. One essential aspect of backpacking is meal preparation, and I have a go-to recipe that is not only easy to make but also budget-friendly and delicious. In this blog post, I will share with you my recipe for dehydrated pad thai, perfect for fueling your adventures without breaking the bank.
Chop and Marinate Tofu or Chicken
To start off this dehydrated pad thai recipe, you’ll need to chop tofu or chicken into small pieces. I prefer using tofu for a vegetarian option. Marinate the tofu or chicken in soy sauce to infuse it with flavor before cooking.
Prepare the Vegetables
Next, prepare the vegetables for your dehydrated pad thai. Shred carrots, slice bell peppers, and mushrooms. It’s important not to use oil when frying the vegetables, as it doesn’t dehydrate well. Cook the vegetables until they are slightly softened.
Dehydrate the Ingredients
Once the tofu/chicken and vegetables are ready, it’s time to dehydrate them. Place everything in a dehydrator, such as the affordable one available on Amazon, and set it to 135°F. Let it dehydrate overnight for at least 8 hours, or until the ingredients are nice and crispy.
Assemble the Pad Thai Mix
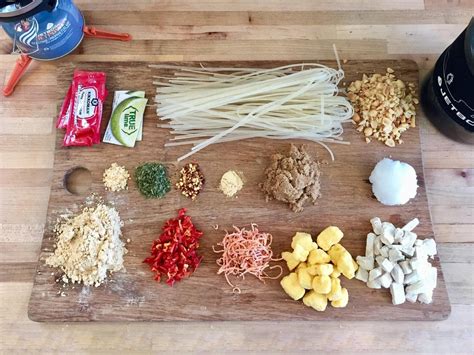
In a bag, combine your rice noodles (uncooked), dehydrated tofu/chicken, and vegetables. In a separate bag, mix the seasonings: garlic powder, ginger powder, brown sugar, powdered peanut butter, and chili flakes for a kick of spice. Feel free to add chopped peanuts for extra crunch. Don’t forget to include a to-go soy sauce packet for added flavor.
Cooking Instructions on the Trail
When you’re ready to enjoy your dehydrated pad thai on the trail, simply add the mix to a little boiling water and let it cook for about 2 minutes. Remove it from the heat, cover it, and let it sit for 10 minutes to rehydrate fully. Finally, sprinkle some chopped peanuts and soy sauce before digging in. This recipe yields two servings, perfect for sharing or indulging in a hearty meal after a long day of hiking.
Have you ever tried dehydrating meals for backpacking trips?
Yes, dehydrating meals for backpacking trips is a great way to save money and enjoy homemade meals on the trail. It’s convenient, lightweight, and allows for easy meal prep while exploring the outdoors.
What are some other dehydrated meal ideas you recommend for backpacking?
Some other dehydrated meal ideas I recommend for backpacking include dehydrated chili, curry, pasta dishes, and oatmeal with dried fruits and nuts. These meals are easy to prepare, pack a punch of flavor, and provide the necessary nutrients for a day of hiking.
How do you ensure your dehydrated meals stay fresh during long backpacking trips?
To ensure that dehydrated meals stay fresh during long backpacking trips, it’s essential to store them in airtight containers or vacuum-sealed bags. Keep them away from heat and moisture, and label each meal with its contents and cooking instructions for easy identification.
What are the benefits of dehydrating meals for backpacking compared to pre-packaged freeze-dried meals?
Dehydrating meals for backpacking offers several benefits compared to pre-packaged freeze-dried meals. Dehydrated meals are customizable, allowing you to control the ingredients and flavors. They are also more cost-effective and environmentally friendly, as you can reduce waste by using reusable containers.
How has dehydrating meals enhanced your backpacking experience?
Dehydrating meals has enhanced my backpacking experience by providing me with nutritious and delicious meals that keep me energized during long hikes. It has allowed me to enjoy home-cooked meals in the wilderness, adding a sense of comfort and satisfaction to my outdoor adventures.